Thursday, April 19, 2012

Why I blog

blog why, why you ask me? (yoda voice) 
picture from our first date - its in our bathroom and has a lot of water damage 
Recently I have been questioning why do I/we blog???
 Blogging is stressful and just one more thing to remember on our already hectic and busy lives here at the cali cooking couple household. Kevin and I decided to do a blog because we needed a goal and project to do together. I think every couple should always have a common goal they are doing together. It is amazing how our lives can be spent together but yet also so far apart.  On this quest to thinking of what we could do i realized that we found ourselves in the kitchen together every night. Just like we had done on our first date. 
Cooking was a passion that Kevin had. I had a desire to eat. I also thought that if this is something that I get to do every night, I want to be good at it. I was going to wear the suit to get the job. Thus our blog was born. Over the past few months our posts have become less frequent and i have been frustrated about how to market and get our name out there. How to share our love with all of you. 
But..........  recently  i took a step back and remembered why. AND NOW I must say I am so proud of myself. Ourselves. We might not look like a top blogger who has the followers or the stats or even is very consistent with their posts- but we are a much happier couple. Who has grown a ton from this blog. It is doing what it was intended to do. 
So kevin I love you and I love that we have been sharing this adventure together. This has brought me 100 times the amount of blessings that I thought it would, or ever could.
We hope that you can bring the joy of food into your lives and that you can also go after your dreams but to always remember to keep in perspective the big picture. 
and yes more recipes are coming..... we are still eating yummy and taking pictures, but my babies are louder {and cuter} than the blog about tending to them. :) 

Lots of love - 
cali cooking couple 
Pin It

Wednesday, April 4, 2012

lemon blueberry coffee cake


Lemon Blueberry Coffee Cake 
Every year I try to have a thanksgiving brunch, but this year that got put on hold because of baby. 
 I had an Easter Brunch instead. 
As always, I stress over what I should make for such an occasion. I love blueberry's and cake. I was going to make a blueberry/raspberry jiffy coffee cake ( which is very good) but I wanted a little more homemade for this occasion. I stumbled across a blog which caught my eye...probably because of the name :)  She had this recipe on here that I had to try. It was delicious. But even more important, I had a great time feeding and chatting with my friends.   


  • ½ cup butter
  • 2 tsp. lemon zest 
  • 3/4 cup and 1 T sugar 
  • 1 T sugar (set aside)
  • 1 egg
  • 1 tsp. vanilla
  • 1 3/4 cup flour 
  • 1/4 cup flour (set aside) 
  • 2 tsp. baking powder
  • 1 tsp.  salt
  • 2 cups fresh blueberries
  • ½ cup buttermilk
  1. Heat oven to 350 
  2. Zest lemon 
  3. Rinse blueberries and mix with 1/4 c flour 
  4. Cream butter, zested lemon, and 3/4 + 1 T sugar until light and fluffy 
  5. Add eggs and Vanilla 
  6. Mix in flour, baking powder and salt 
  7. Mix in buttermilk 
  8. Fold in blueberry mixture. 
  9. Sprinkle 1 T Sugar on top 
  10. Bake in 8x8 or 9x9 pan for 30-40 minutes 

* tossing the blueberries in the flour coats the berries so they incorporate evenly and don't just fall to the bottom. 

Adopted from alexandra cooks  check her out, she has a wonderful name and some great recipes 
Pin It

Friday, March 30, 2012

New Foods coming

I definitely have dropped the ball on doing posts. Life gets in the way sometimes, but it doesn't mean the Cali Cooking Couple hasn't been cooking. We still enjoy in our busy lives cooking everyday and sometimes even late at night as the craving hits! Here are some pics of things we will post soon and some that we have just been cooking as of late. Have a great Friday!


Pin It

Friday, March 16, 2012

Cast iron pot artisan bread.

First of all my apologizes for a month of no posts. My infant has been sick. -sad face -
But on the bright side I found a delicious and even better EASY artisan bread recipe that I cook in my cast iron pot that I'm in love with. It even turned out the first time AND was picture perfect.
I was going to do a bunch of experimenting with mix ins but my yeast was being weird.
Anyways.... On to the recipe.


• 3 cups flour
• 1 3/4 t salt
• 1/2 t yeast
• 1 1/2 c water

1. Mix dry ingredients in a big bowl ( I use my kitchen aid bowl)
2. Add water and gently mix in with wooden spoon or spatula - will be super sticky and goopy
3. Cover with suran wrap and place on counter for 12-18 hours.

See easy easy easy. I would do this at 10:30 before I went to bed...yes total procrastination.

4. Heat oven to 450 and place for cast iron enamel pot with lid in for 30 mins.
Le cruset, Costco has a good one , Paula dean
5.flour a tea towel and place goopy bread dough on it. Cover with wrap for the 30 mins the pot is heating up.
6. CAREFULLY remove the pot. And place dough in pot. Don't oil the pan.
7. Cook at 450 for 30 mins then take off lid and cook for 15 more.
8. Pull put beautiful bread and be ridiculously proud of yourself.

- You can double recipe just cook in two different pots.
I make them in two different bowls because I only have one pot. And since the rising process is 12-18 hours I have enough time for one to cook before I do the other.

- mix ins I did accomplish
1. Garlic and rosemary.
Add three cloves finly chopped garlic and 2 springs finly chopped rosemary. Add into goopy dough before the 12 hour rise.

2. Garlic and cheddar.
Add 2 cloves chopped garlic and a hardy handful graded cheddar cheese. I use the big block from Costco.

Tell me all your add ins. I'm going to experiment more also and let you know what I find.

-Alix Pin It

Monday, February 13, 2012

valentine's buttercream cake with strawberries

Cake, strawberries and buttercream frosting.... yes please 

I have been craving cake lately and thought I would make a quick 
valentine's cake
to show some love this month. 
For my birthday, I always get white cake with strawberry filling and buttercream frosting from our local bakery. My family always makes fun of me that I have no variety- but I like what I like. And I LIKE!!! ...I'm liking this better though :) 

White cake 

4 egg whites
2 cups all-purpose flour
1 teaspoon baking powder
1/2 teaspoon baking soda
1/2 teaspoon salt
1/2 cup butter or shortening, softened
3/4 cups sugar
1 teaspoon vanilla
 1 1/3 cups buttermilk

  1. Break eggs and separate. Set aside and let rest for 30 minutes 
  2. In a medium bowl stir together flour, baking powder, baking soda, and salt; set aside.
  3. In a large mixing bowl beat butter with an electric mixer on medium to high speed for 30 seconds. 
  4. Add sugar and vanilla; beat until well combined. 
  5. Add egg whites one at a time, beating well after each addition.
  6. Alternately add flour mixture and buttermilk to butter mixture, beating on low speed after each addition just until combined. Spread batter into the prepared pan(s).
  7. Cook at 350 for 30 minutes in a round 8 inch cake pan 


Chocolate cake 

3/4 cup butter 
3 eggs
2 cups ap flour 
3/4 cups unsweetened cocoa powder 
1 teaspoon baking soda
3/4 teaspoon baking powder 
1/2 teaspoon salt
2 cups sugar 
2 teaspoons vanilla 
1 1/4 cups milk 
  1. Warm butter and eggs to room temp 
  2. Stir together flour, cocoa powder, baking soda, salt - set aside 
  3. Beat butter for 30 seconds, slowly add sugar and mix 4-6 minutes 
  4. Add in eggs 1at a time
  5. Add vanilla 
  6. Alternate adding in flour and milk
  7. Spread into 8 inch pans and bake at 350 for 35-40 minutes 
  8. Cool in pan for 10 minutes on wire rack than remove to finish cooling. 

- recipes adopted from better homes and garden 

Butter Cream frosting 
you can also click here for recipe 

3 cups confections’ sugar
1 cup butter softened over night
1 teaspoon vanilla extract
1-2 tablespoons whipping cream  
  1. In a standing mixer equipped with the whisk, mix overnight soft butter and confection’s sugar. 
  2. Mix on a low speed until blended then increase to medium and whisk for 3 minutes.
  3. Add vanilla and cream and beat for another minute. Add more cream according to desired consistency
- you can get clear vanilla at most cooking stores if you want pure white frosting.
- make sure and whisk for the whole 3 minutes- it does make a difference. 


I decided to stack this cake to show its two flavors and because I can not frost a cake. They turn out ugly- very very ugly, not a skill that I have. 

I hope that you enjoy this wonderful cake. It is a perfect valentine or anytime treat. 

-ALIX 

Pin It

Wednesday, February 8, 2012

healthy habits coloring chart

Today the topic in my life seemed to be healthy habits and the childhood obesity problem. 
My eldest was having a hard time with dinner tonight so I thought it was time to sit him down and explain to him the food pyramid... He does much better when he understands the "why" behind the rule. He then expressed that he can't remember what healthy food he eats during the day. Me either I told him. So I sat down tonight and made him a coloring chart. (life is just so much better when you can mark/color in your progress). We also talked about exercise and trying new foods. Since I was so proud of my chart I thought I would share it with the rest of you. Wish me luck and let me know how it goes in your household. 

Pin It

Tuesday, January 31, 2012

chicken pesto sandwich

Yesterday I made our yummy Chicken Pesto Pizza with Red Grapes. 
I have left over pesto, chicken, and cheese- 
Chicken Pesto Sandwich 


  • crusty baguette or bread- i like the kind from costco 
  • pesto 
  • mozzarella cheese 
  • left over chicken 
  • tomatoes 
  1. Spread pesto over bread
  2. add tomato, chicken and cheese 
  3. broil till cheese melts
Cut up tomato and add balsamic vinegar, and salt for a fresh tomato salad.

Same ingredients, whole new taste

** if you still have left over pesto place into old fashion ice cube trays freeze. Pop them out and store in freezer. Take out cubes when needed.


Pin It

Thursday, January 26, 2012

winners- ticket kitchen giveaway

we have our ticket kitchen winner. 
Our grand prize winner is Sue Lambrix
 - She won a serving for 4 of the Salted Carmel 
Our second place is Erica Williams - She won a Three Chili and Vanilla Mint 
Our third place is Shannon Hattyar- she won a French Chocolate 

Please contact me with your address and info so I can get you your prizes. 
thank you to ticket kitchen and all those who participated. 
We truly enjoy all the love and support you have shown us.
Pin It

Monday, January 23, 2012

popcorn party


Who does not love popcorn? I do!! Last week I had a
girls night popcorn party
A grown up party needs grown up popcorn.  We had six types of popcorn. 

1. white chocolate with candy 2. sweet kettle corn 3. rosemary 

4. creamy carmel    5. bacon    6. garlic and parmesan 
Basic popcorn

  • oil 
  • popcorn kernels
  • salt 
  • butter 
  1. Cover the bottom of the pan with oil and seeds and 1-2 T butter 
  2. Turn heat to medium 
  3. Cover
  4. When you hear the corn start a popping crack the lid 
  5. Take off heat when popcorn stops popping. 
  6. add salt 
1. White chocolate with candy 

  • white chocolate chips 
  • candy cane 
  • candy 
  • tin foil 
  1. Make basic popcorn 
  2. melt desired amount of white chocolate chips 30 second in the microwave mix then 10 seconds until melted 
  3. - I added  finely chopped candy cane for a peppermint taste 
  4. lay popcorn on tin foil and drizzle over melted chocolate and candy. Sprinkle over candy and mix with hands. 
  5. Cool and serve 
2. Sweet kettle corn 
  • 1/3 cup popcorn kernels
  • 1/4 cup sugar 
  • 1/4 cup oil 
  • 1-2 tsp vanilla 
  1. add all above ingredients into pot or a whirly pop and turn on medium heat 
  2. keep shaking pot or turning whirly pop until popping stop
3. Rosemary 
  •  1 cup olive oil 
  • 1/2 cup popcorn kernels
  • rosemary sprig 
  • salt 
  1. add oil and rosemary sprig and turn on medium low heat 
  2. infuse for 5 minutes 
  3. take out sprig and half the oil 
  4. add kernels
  5. when done add oil you took out 
4. creamy carmel corm 
  • 2 cups sugar 
  • 3/4 cups light corn syrup (Karo)
  • 1/2 cup butter 
  • 2 cups half & half 
  • *5 bags "Orville Redenbackers's" LIGHT (microwave) popcorn
  1. make basic popcorn or pop microwave popcorn - discard all unpopped kernels 
  2. in heavy 3 quart pan, heat sugar, corn syrup, butter, and 1 CUP half and half, stir constantly 
  3. when it comes to boil add remanning half & half  
  4. still till reaches 240* on candy thermometer 
  5. poor over popcorn 
- this does take a while 

5. bacon 
  • bacon bits 
  • bacon grease 
  • popcorn kernels 
  • salt 
  1. cook bacon 
  2. while grease is still hot add kernels
  3. cut up bacon and add 
6. garlic and parmesan 
  • roasted garlic bulb
  • 1 garlic clove
  • oil
  • 5 T butter 
  • parmesan 
  • popcorn kernels 
  1. roast garlic bulb in oven 
  2. cover bottom of pot with oil and a garlic clove heat on low for five minutes 
  3. remove clove 
  4. add popcorn kernels and pop 
  5. blend up parmesan cheese, 3 roasted garlic cloves from bulb and add to melted butter 
  6. pour over popcorn 


Pin It

Friday, January 20, 2012

mason jars

I love mason jars !! 
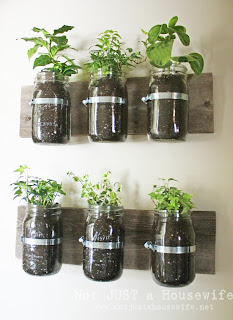
I think they are iconic for any kitchen. Here are some fun ideas of what to do with your mason jars 

 Make them into a garden. I have this in my window 


I thought this was fun. Take an old salt carter spout and add it to a mason jar to easy pour 


I love to drink out of old jars. My mom used to have them in our cup drawer growing up. It reminds me of my childhood. 

This is my favorite. Serving size pies in a jar. I love this idea. A great "thinking of you" girlfriend gift. 


-alix 
Pin It

Thursday, January 19, 2012

Grandma's Lemon Cookies


Now I know that you are thinking seriously more lemons. I am in love with lemons right now. My name sake grandmother would cook me these cookies every time I went to her house and they are my favorite. 

Lemon Cookies 
  • 1 cup butter 
  • 1/2 cup powdered sugar 
  • 2/3 cup corn starch 
  • 1 cup flour 

Lemon Frosting 
  • 1/4 cup butter 
  • 2+ Tbs Fresh Lemon Juice 
  • rine of a Lemon 
  • -Powdered sugar to spread - Can be a whole box you buy at store. All Preference.

1. Mix butter and powdered sugar 
2. Add corn starch 
3. Add flour and mix 
4. Drop teaspoons onto cookie sheet and indent and cook 325* for 15 minutes - 
5. Cool 
6. Mix frosting butter 
7. Add  fresh squeezed lemon for  juice 
8. Grate lemon 
9. Add powdered sugar to spreadable consistency. 
10. ENJOY !!!!! and then say "this is the best cookie ever"
11. Hide them because you will eat the whole batch. 
Pin It

Wednesday, January 18, 2012

Giveaway- Ticket Kitchen

Six months ago we made a new years resolution. (who says you can't make a resolution in july) To find something for us to do together- just for us.  Thus our blog was born. It has been a great six months and our love for each other and cooking has grown more than we have imagined. We truly have enjoyed sharing the start of our journey with all your wonderful love and support. To thank you, we have a wonderful giveaway available to all our current followers on our blog or facebook and anyone who comments telling us what your new years resolution is. 
note: We will be having multiple winners :) 


Our give way, just in time for Valentine's Day, is from the wonderful Ticket Kitchen. I am sure that you have heard of this delightful, hot chocolate on a stick, treat since they have been featured on the Today show, in Real Simple, Sunset Magazine,  Ladies Home Journal, Amy Atlas Events, Cooking Light and The Chicago Tribune to just name a few. They are just celebrating their one year anniversary and it has been fun to watch their new company grow. Congratulations to our local friends.

Giveaway results will be posted the evening of  Wednesday, January 25th. 
Pin It

Thursday, January 12, 2012

popcorn party

I had my popcorn party last night. It was so much fun. Thank you to all my friends who came and ate one of my favorite treats with me.
Pictures and recipes will be up soon!!! 
Pin It

Wednesday, January 11, 2012

Chicken Tenders with Ranch Dressing

Well here it is friends iheartfoodandsocanyou recipe. This amazing couple loves food as much as we do so we decide to do a recipe swap for all our wonderful fans.  For the month of January, they decided to post delicious but healthy recipes to jump start the new year. Here's one that is incredibly easy and so very delicious. You know how sometimes you can taste the "healthy" in healthy cooking...well not here. The chicken tenders come out hot, crispy & flavorful and don't forget the creamy ranch dressing. You will love making this for your family or just for you:-)


B&K currently reside in Orange County, California. They enjoy cooking and baking together in their kitchen as well as finding restaurant gems in the OC. We are not acclaimed chefs or bakers nor do we pretend to be. We are two people with a small camera that love exploring food and enjoy learning how to make simple items extraordinary. 

Chicken Tenders with Ranch Dressing 
(Originated from Rocco Dispirito- Now Eat This!)

Chicken

  • 1 C Whole wheat Flour
  • 2 1/2 C panko bread crumbs (preferably whole wheat but if you can't find it don't sweat it)
  • 1/2 tsp. poultry seasoning
  • 4 Large egg whites
  • 8 oz (about 8) chicken tenders
  • Salt
  • Freshly Ground Pepper
  • Nonstick Cooking Spray (I used Pam- Organic Olive Oil)
Dressing
  • 3 Tsp ranch salad dressing & seasoning mix
  • 6 Tbl reduced-fat sour cream
  • 6 Tbl low-fat buttermilk
  1. Preheat oven to 450 degrees.
  2. Start by pulling out two shallow dishes and a medium bowl. In the first shallow dish, place the flour and in the second mix the panko bread crumbs with the poultry seasoning.
  3.  Place the egg whites in the medium bowl. Using a whisk, whisk until the egg whites are foamy but not to where they hold stiff peaks.
  4.  Place a wire rack over a foil-lined baking sheet. 
  5. Season your chicken with salt and pepper on both sides.    *** Here's where the fun part begins. K would be very proud of my since I'm not a huge fan of touching raw meat haha.
  6.  Place the chicken tenders in the flour and shake off any excess.
  7. Now place the floured chicken tenders into eggs. Coat them until they are completely covered. 
  8. Once at a time, place the chicken tenders into the panko bread crumbs and coat each one completely. Place on the wire rack.
  9. Salt and pepper the chicken tenders again as well as spray a little bit of cooking spay on each one (both sides). This will help give them a golden look. 
  10. Bake at 450 degrees for about 10 minutes or until golden & cooked all the way through. 
  11. While the chicken is baking whip together your ranch dressing by mixing the seasoning, sour cream and buttermilk together. Store in the refrigerator until ready to serve.
The chicken tenders were delicious, especially paired with the ranch dressing. The dish is so good and pretty healthy too with only 198 calories a serving. Happy New Year everyone!


Steps 4-9


                  Step 1 
Pin It